How to Set Up a Microsoft 365 SharePoint File Server with Auto-Mounting to OneDrive or PCs: A Step-by-Step Guide

With businesses increasingly moving to the cloud, Microsoft 365 SharePoint offers a powerful way to manage files and collaboration across teams. However, navigating its file server setup and integrating it with users’ OneDrive and PCs can be tricky. This tutorial will walk you through setting up a SharePoint file server, automating file access for your users, and training them for seamless use.
Let’s dive in!
Why Use SharePoint as a File Server?
SharePoint’s cloud-based file storage is highly secure, scalable, and integrates directly with other Microsoft 365 services like OneDrive and Teams. By setting up a SharePoint file server, you can:
- Centralize file storage and management.
- Control access based on departments, teams, or projects.
- Ensure files are accessible from anywhere, on any device.
- Automate the syncing of files to users’ OneDrive or PCs, simplifying file access.
Step 1: Setting Up the SharePoint File Server
1.1 Create a SharePoint Site
First, you’ll need a SharePoint site that will host your file server:
- Sign in to Microsoft 365 Admin Center and navigate to SharePoint Admin Center.
- Under Active Sites, click Create, and choose the site type (e.g., Team site for collaboration).
- Name your site, set permissions (private or public), and finish creating it.
1.2 Configure Document Libraries and Folder Structures
- Once your site is live, go to the Documents section. This will be your main file repository.
- Click New > Document Library to create separate libraries for departments or projects (e.g., HR, Marketing).
- For each library, you can create folders and subfolders to organize your files. Keep your folder structure simple and intuitive for easy navigation.
Step 2: Managing Permissions and Security
Security is key in any file management system. SharePoint lets you assign specific permissions to ensure sensitive files are protected.
2.1 Set Permissions for Libraries
- Open the document library you created.
- Click on Settings > Library Settings, and then click Permissions for this document library.
- You can assign permissions to users or groups (e.g., Read, Edit, or Full Control).
- You can also create Microsoft 365 Security Groups and assign them specific permissions to simplify management.
Step 3: Automating File Access with OneDrive
Now that your SharePoint libraries are set up, the next step is ensuring users can access them seamlessly via OneDrive or as mapped network drives.
3.1 Sync Document Libraries to OneDrive
OneDrive allows users to sync SharePoint libraries directly to their local file system:
- Open the SharePoint document library you want to sync.
- Click the Sync button on the toolbar (make sure users have the OneDrive desktop app installed).
- This will trigger the sync process, and the library will now appear in their File Explorer under OneDrive, allowing them to access and work on files as if they were on a local network.
3.2 Automate OneDrive Sync via Group Policy (for IT Admins)
To ensure all users sync SharePoint libraries automatically without needing to manually click the Sync button, you can set this up through Group Policy.
- Download and install the OneDrive ADMX templates from Microsoft.
- Open Group Policy Management and create a new GPO.
- Navigate to:
Computer Configuration > Policies > Administrative Templates > OneDrive - Enable the policy Sync SharePoint libraries automatically, and add the URL of the document library you want to sync.
- Apply the GPO to the users’ organizational unit (OU), and from now on, their OneDrive will automatically sync the designated SharePoint libraries.
Step 4: Mapping SharePoint Libraries as Network Drives
If some users prefer seeing their SharePoint folders as a mapped drive, you can set this up via a PowerShell script or Group Policy.
4.1 Map a SharePoint Library via PowerShell
- Open PowerShell as an administrator on the user’s PC.
- Use the following script to map the SharePoint library to a network drive:
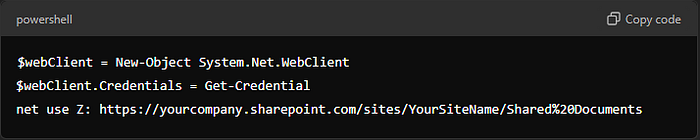
- Replace the URL with your SharePoint document library URL.
- The drive (e.g.,
Z:) can be any available letter on the user’s system.
- Run the script to complete the mapping. The SharePoint library will now appear as a network drive.
4.2 Automate Mapping via Group Policy
- In Group Policy Management, create a new GPO for Drive Mapping.
- Go to:
User Configuration > Preferences > Windows Settings > Drive Maps - Add a new mapped drive and set the location to the URL of your SharePoint library.
- Apply the policy to the required OU.
Step 5: Training Your Users
5.1 Create Training Materials
- For Administrators: Provide guides on managing document libraries, permissions, and how to configure automation via Group Policy or PowerShell.
- For End Users: Create simple step-by-step guides showing how to access SharePoint libraries via OneDrive or as mapped drives. Use screenshots and short videos to enhance the learning process.
5.2 Deliver Training Sessions
Hold live or recorded training sessions to walk users through:
- How to access their synced SharePoint libraries in File Explorer.
- How mapped drives work and how to troubleshoot sync issues.
Step 6: Testing and Support
Before rolling this out organization-wide:
- Test the Setup: Ensure a few users from different departments can access files through OneDrive and mapped drives without issues.
- Provide Support: Be available during the rollout to address any issues and fine-tune the setup as needed.
Conclusion
Setting up a SharePoint file server integrated with OneDrive and PCs is a smart way to streamline file access and management in Microsoft 365. With the steps outlined above, you’ll be able to configure a scalable and secure file system that your users can easily access and use — whether it’s through OneDrive or mapped drives. The combination of automation, user training, and post-rollout support ensures a smooth transition and optimal user experience.
Feel free to share your experiences or ask questions in the comments!
